1. Writing your First Cool App
1.1. Scope of This Tutorial
In this tutorial, we will focus on how to write our first simple and cool app.This means that we will write a very simple app that should display and handle three basic GUI elements: an EditText (Textfield), a Button, and a TextView. Learning these basic GUI elements is essential for any future project, as these GUI elements will highly likely be part of your app.
2. Prepare your Project
2.1. Remove the default “Hello World!” from the Default Project
First of all, in order to implement the GUI elements mentioned earlier, you need to remove the default “Hello World!” textView from the project. We do this so that we can start off with an Android project that does not hold any GUI elements we do not need now. In order to do so, you need to go to your project > res > layout > fragment_main.xml. There you see this:
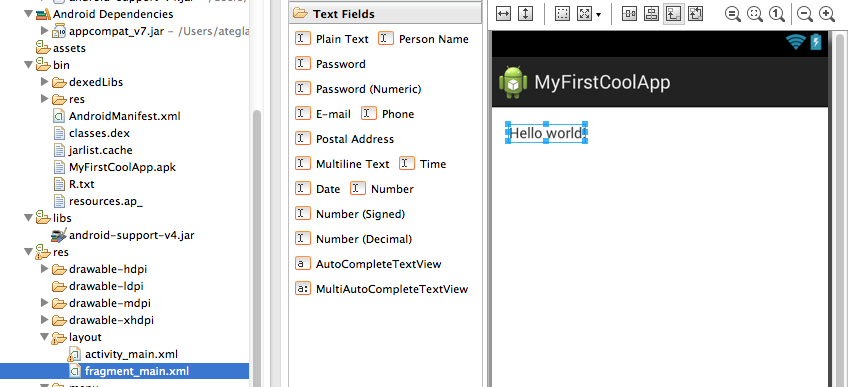
Mark the “Hello_world” textView element and remove it by clicking the enter key.
Now go your activity_main.xml file.
3. Using Standard GUI Elements
3.1. How to Create GUI Elements
The first thing you need to learn is that there are always to ways of how to create your GUI elements: programmatically or by drag and drop.
1) Programmatically means that you always have the possibility to create your won GUI elements via coding them. For example, an activity_main.xml file is the visual representation of your GUI elements, such as this:
You can access the source code of this activity_main.xml file via clicking on “Graphical Layout” in the lower area of the Android SDK. The default code of your activity_main.xml file looks like this:
<FrameLayoutxmlns:android=“http://schemas.android.com/apk/res/android”

    xmlns:tools="http://schemas.android.com/tools"

    android:id="@+id/container"

    android:layout_width="match_parent"

    android:layout_height="match_parent"

    tools:context="com.example.myfirstcoolapp.MainActivity"

    tools:ignore="MergeRootFrame">

</FrameLayout>
|
As a result, if you intend to add, change, or delete GUI elements from or to a Fragment, you can either remove it via marking and deleting it or you go to the source code and delete the respective GUI code programmatically / manually.
3.1.1 How to Create an EditText
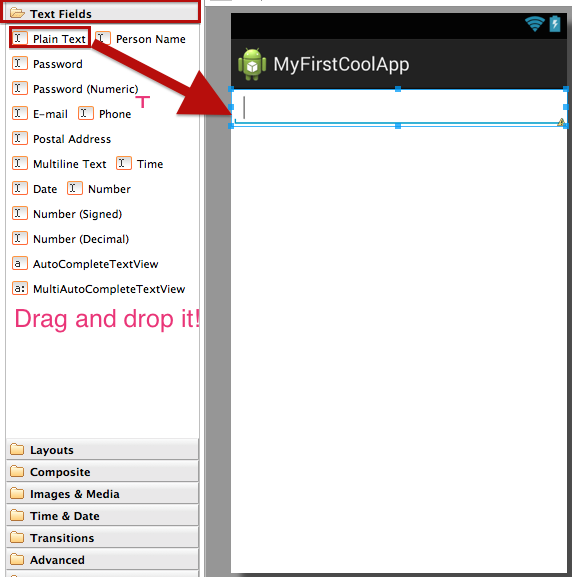
For this tutorial, we will use an EditText. An EditText is a GUI element belonging to the GUI section “Text Fields”. Here, we will be using a “Plain Text.” Bear in mind that there are many more types of text fields, such as for passwords, email, phone, and so on. For this tutorial, this EditText is used for handling values that a user types in. Hence, go to your project, click on the fragment_main.xml file (check that you are in “graphical layout” mode) and click the tab “Text Fields”
If you switch to the source code view of this fragment_main.xml, it looks like this:
<RelativeLayoutxmlns:android=“http://schemas.android.com/apk/res/android” xmlns:tools="http://schemas.android.com/tools" android:layout_width="match_parent" android:layout_height="match_parent" android:paddingBottom="@dimen/activity_vertical_margin" android:paddingLeft="@dimen/activity_horizontal_margin" android:paddingRight="@dimen/activity_horizontal_margin" android:paddingTop="@dimen/activity_vertical_margin" tools:context="com.example.myfirstcoolapp.MainActivity$PlaceholderFragment"> <EditText android:id="@+id/editText1" android:layout_width="261dp" android:layout_height="wrap_content" android:ems="10"/> </RelativeLayout> |
So, you see that the Android SDK automatically generated the necessary source code for having an EditText GUI element in this activity. This is quite handy! However, if you intend to make changes manually, you have to programmatically make the changes here. However, we will continue adding more GUI elements.
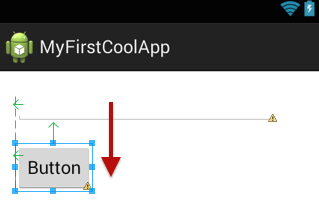
3.1.2 How to Create a Button
In order to add a button, you need to go to your project > Form Widgets > Button. As in the case of the EditText, just drag and drop it to your activity. Now, you may encounter the following:

3.1.2.1 Programmatically
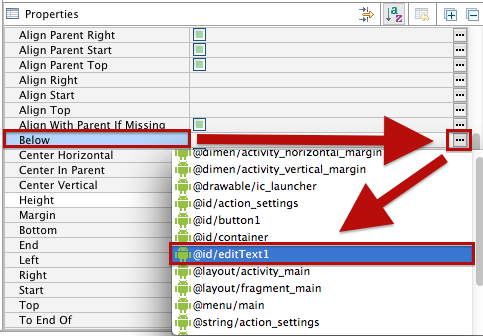
Here, we have the problem that the alignment of the two GUI elements is incorrect, meaning that the two overlap each other. As we do not want this, we need to take a closer look at the GUI properties. A GUI element in Android possesses a very great array of different properties. For example, in the case of aligning GUI elements in relation to each other, there is a “below” property. You can find it if you double click on the Button element. Then, you see on the right hand the section where it says “Outline.” The outline shows you the hierarchy of GUI elements of this fragment_main.xml. If you click on the Button element you receive in the lower section of this outline view a list of properties. There, you can find the property “Below.” Now, click on the item with the three dots and a new drop down list pops up, illustrating a list of potential elements you can choose from. At first sight, you will not understand what all the other elements in this list are needed for; for this tutorial, look for “@id/editText1.” Remember that “@id” is the tag indicating the Android SDK that there is an element having a specific name across the whole app. In this case, the “id name valid across the whole app” is “editText1,” meaning that we are referring to the EditText GUI element we created previously. Hence, by using this reference, we make sure that the Button GUI element is placed below the EditText GUI element with a relative reference.
3.1.2.1 Drag and Drop
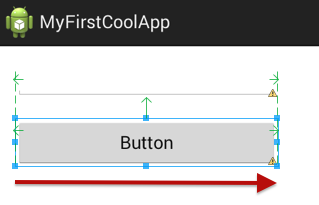
Of course, you can also do it the easy way and only drag and drop the Button and move it to the place where you need it. For example, here:
Furthermore, if you click on the highlighted right frame line in blue, you can also lengthen the Button so that it has the same width as the EditText GUI element:
At the end, the source code of this fragment_main.xml looks like this:
<RelativeLayoutxmlns:android="http://schemas.android.com/apk/res/android"

    xmlns:tools="http://schemas.android.com/tools"

    android:layout_width="match_parent"

    android:layout_height="match_parent"

    android:paddingBottom="@dimen/activity_vertical_margin"

    android:paddingLeft="@dimen/activity_horizontal_margin"

    android:paddingRight="@dimen/activity_horizontal_margin"

    android:paddingTop="@dimen/activity_vertical_margin"

    tools:context="com.example.myfirstcoolapp.MainActivity$PlaceholderFragment">

        <EditText

        android:id="@+id/editText1"

        android:layout_width="261dp"

        android:layout_height="wrap_content"

        android:ems="10"/>

    <Button

        android:id="@+id/button1"

        android:layout_width="wrap_content"

        android:layout_height="wrap_content"

        android:layout_alignLeft="@+id/editText1"

        android:layout_alignRight="@+id/editText1"

        android:layout_below="@+id/editText1"

        android:layout_marginTop="20dp"

        android:text="Button"/>

</RelativeLayout>
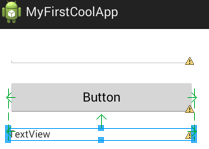
3.1.3 How to Create a TextView
Lastly, we will add a TextView to our fragment_main.xml. Also, do not forget to extend its width to the same width of the other GUI elements in order to make it look clean.
At the end, the source code of this fragment_main.xml looks like this:
<RelativeLayoutxmlns:android="http://schemas.android.com/apk/res/android"

    xmlns:tools="http://schemas.android.com/tools"

    android:layout_width="match_parent"

    android:layout_height="match_parent"

    android:paddingBottom="@dimen/activity_vertical_margin"

    android:paddingLeft="@dimen/activity_horizontal_margin"

    android:paddingRight="@dimen/activity_horizontal_margin"

    android:paddingTop="@dimen/activity_vertical_margin"

    tools:context="com.example.myfirstcoolapp.MainActivity$PlaceholderFragment">

        <EditText

        android:id="@+id/editText1"

        android:layout_width="261dp"

        android:layout_height="wrap_content"

        android:ems="10"/>

    <Button

        android:id="@+id/button1"

        android:layout_width="wrap_content"

        android:layout_height="wrap_content"

        android:layout_alignLeft="@+id/editText1"

        android:layout_alignRight="@+id/editText1"

        android:layout_below="@+id/editText1"

        android:layout_marginTop="20dp"

        android:text="Button"/>

    <TextView

        android:id="@+id/textView1"

        android:layout_width="wrap_content"

        android:layout_height="wrap_content"

        android:layout_alignLeft="@+id/button1"

        android:layout_alignRight="@+id/button1"

        android:layout_below="@+id/button1"

        android:layout_marginTop="19dp"

        android:text="TextView"/>

</RelativeLayout>
4. How to Hook up all Three GUI Elements
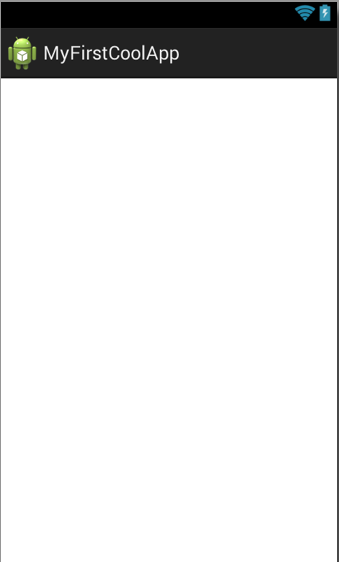
Up to now, we have only created the GUI elements that are merely displayed. For example, if you compile your project and run it on the Android simulator, you will see your three GUI elements there, but they will do nothing. Hence, our next task is to fill these “empty” GUI elements with life, meaning that we will actually code some functionality so that these GUI elements interact with each other.
4.1. Creating a Connection Between the (GUI) XML file and the Java Code
In the previous chapters, we created our GUI elements by either writing them manually or by drag and drop. However, in both cases, the result is the same, namely, that we only have created GUI elements in an XML file. To be more precise, we created an EditText, a TextView, and a Button in the fragment_main.xml, whereby they are only displayed. In order to make them actually do something, we need to go to the Java code. As we had created the GUI elements in a fragment and, thus, the GUI elements are located in the fragment_main.xml, we also need to implement the respective code for a fragment.
Hence, let us go to your project > src > com.example.myfirstcoolapp > MainActivity.java
First of all, we need to create a connection between the GUI XML file and the Java code by declaring the respective GUI elements. As the GUI elements are displayed in a fragment, we also go to the following place within the MainActivity.java:
public static class PlaceholderFragment extends Fragment{

}
The Android SDK generated this class called “PlaceholderFragment” that extends the original Fragment class. As a result, if you intend to rename this “PlaceholderFragment” class, feel free to do so; however, in this tutorial, we will stick to the default names.
In order to declare your GUI elements, you first have to import the respective classes from the Android operating system by:
import android.widget.Button;

import android.widget.EditText;

import android.widget.TextView;
Now, the Android SDK can recognize the key words, such as TextView, to make the declaration of GUI elements possible. Therefore, the syntax for declaring the GUI elements has to look like this: the name of the Android-inherent GUI class responsible for your GUI element followed by a variable name you intend to use. For example, our EditText object would need to be declared like this:
EditText theCoolEditText;
The same holds true for the other two GUI objects:
Button theCoolButton;

TextView theCoolTextView;
Furthermore, we also need a helper variable for the upcoming functionality we will implement, namely, a string variable:
String theCoolString;
As a result, the PlaceholderFragment class looks like this up to now:
public static class PlaceholderFragment extends Fragment{

        // Here, we create our GUI variables

        EditText theCoolEditText;

        Button theCoolButton;

        TextView theCoolTextView;

        String theCoolString;
Now, we leave the code here and we move on to another one, namely:
public View onCreateView(LayoutInflater inflater, ViewGroup container,

                Bundle savedInstanceState) {

               View rootView = inflater.inflate(R.layout.fragment_main, container, false);
After this line of code, you actually instantiate those variables by hooking them up where you declared them in the XML file before:
// Here, we instantiate our GUI instance variables

            theCoolEditText = (EditText)rootView.findViewById(R.id.theCoolEditText);

            theCoolTextView = (TextView)rootView.findViewById(R.id.theCoolTextView);

            theCoolButton = (Button)rootView.findViewById(R.id.theCoolButton);
Now, the rules for hooking up your GUI elements generated in the XML file with the Java code is this: you use the already declared GUI variable, such as theCoolEditText, you put an equal sign after it in order to tell the Android operating system that what comes next is where it can find the GUI element in the XML file. Please bear in mind that the syntax goes this:
( Here you name the class of the GUI element you want to use) theNameOftheViewWhereTheGUIElementShouldBeDisplayed.findViewById(R.id.theIDNameOfTheGUIElementYouChosePreviously);
Bear in mind that the view where the three GUI elements are displayed in our case is called “rootView.” It is the default name that the Android SDK chose to use for this project, you could also rename it with another one; however, we will use the default name here.
Now, you have successfully hooked up the GUI elements from the XML file in the Java code. Nonetheless, if you compiled the app and ran it now in the Android simulator, you would not see any difference. The reason is that you still need to implement an event listener that makes sure that your app actually is notified when the user clicks on your button. Thus, in order to provide this functionality, you need to import am “OnClickListener” by the following:
import android.view.View.OnClickListener;
Now, you can use an event listener triggered by your button. In order to make that possible, you have to write the following code:
theCoolButton.setOnClickListener(new OnClickListener()

  {

  }

);
After having set your OnClickListener on your button, you now have to decide what should happen when the user clicks on the button. As described in the introduction of this tutorial, we want the text coming in from the EditText to appear in the TextView, and the button triggers this. Hence, we need to formulate this in Java code like this:
theCoolButton.setOnClickListener(new OnClickListener()

            {

      @Override

       public void onClick(View v) {

          theCoolString = theCoolEditText.getText().toString();

          theCoolTextView.setText(theCoolString);

          }

    });
The code above does the following: first, we use the “theCoolString” to fill it with the string coming from the “theCoolEditText.” Second, we use this “theCoolString” now filled with a string and display it in the “theCoolTextView.” And that’s it. Run the app and then you see it works.
This is the complete code of fragment_main.xml:
<RelativeLayoutxmlns:android="http://schemas.android.com/apk/res/android"

    xmlns:tools="http://schemas.android.com/tools"

    android:layout_width="match_parent"

    android:layout_height="match_parent"

    android:paddingBottom="@dimen/activity_vertical_margin"

    android:paddingLeft="@dimen/activity_horizontal_margin"

    android:paddingRight="@dimen/activity_horizontal_margin"

    android:paddingTop="@dimen/activity_vertical_margin"

    tools:context="com.example.myfirstcoolapp.MainActivity$PlaceholderFragment">

     <EditText

        android:id="@+id/theCoolEditText"

        android:layout_width="261dp"

        android:layout_height="wrap_content"

        android:ems="10"/>

    <TextView

        android:id="@+id/theCoolTextView"

        android:layout_width="wrap_content"

        android:layout_height="wrap_content"

        android:layout_alignLeft="@+id/theCoolButton"

        android:layout_alignRight="@+id/theCoolButton"

        android:layout_below="@+id/theCoolButton"

        android:layout_marginTop="26dp"

        android:text="TextView"/>

    <Button

        android:id="@+id/theCoolButton"

        android:layout_width="wrap_content"

        android:layout_height="wrap_content"

        android:layout_alignLeft="@+id/theCoolEditText"

        android:layout_alignRight="@+id/theCoolEditText"

        android:layout_below="@+id/theCoolEditText"

        android:layout_marginTop="24dp"

        android:text="Button"/>

</RelativeLayout>
This is the complete code of MainActivity.java:
 package com.example.myfirstcoolapp;

import android.support.v7.app.ActionBarActivity;

import android.support.v7.app.ActionBar;

import android.support.v4.app.Fragment;

import android.os.Bundle;

import android.view.LayoutInflater;

import android.view.Menu;

import android.view.MenuItem;

import android.view.View;

import android.view.View.OnClickListener;

import android.view.ViewGroup;

import android.widget.Button;

import android.widget.EditText;

import android.widget.TextView;

import android.os.Build;

public class MainActivity extends ActionBarActivity{

@Override

    protected void onCreate(Bundle savedInstanceState) {

        super.onCreate(savedInstanceState);

        setContentView(R.layout.activity_main);

        if (savedInstanceState == null) {

            getSupportFragmentManager().beginTransaction()

                    .add(R.id.container, new PlaceholderFragment())

                    .commit();

        }

    }


    @Override

    public boolean onCreateOptionsMenu(Menu menu) {


        // Inflate the menu; this adds items to the action bar if it is present.

        getMenuInflater().inflate(R.menu.main, menu);

        return true;

    }

    @Override

    public boolean onOptionsItemSelected(MenuItem item) {

        // Handle action bar item clicks here. The action bar will

        // automatically handle clicks on the Home/Up button, so long

        // as you specify a parent activity in AndroidManifest.xml.

        int id = item.getItemId();

        if (id == R.id.action_settings) {

            return true;

        }

        return super.onOptionsItemSelected(item);

    }

    /**

     * A placeholder fragment containing a simple view.

     */

    public static class PlaceholderFragment extends Fragment{

        // Here, we create our GUI variables

    EditText theCoolEditText;

    Button theCoolButton;

        TextView theCoolTextView;

        StringtheCoolString;

        public PlaceholderFragment() {

        }

        @Override

        public View onCreateView(LayoutInflater inflater, ViewGroup container,

                Bundle savedInstanceState) {

            View rootView = inflater.inflate(R.layout.fragment_main, container, false);

            // Here, we instantiate our GUI instance variables

            theCoolEditText = (EditText)rootView.findViewById(R.id.theCoolEditText);

            theCoolTextView = (TextView)rootView.findViewById(R.id.theCoolTextView);

            theCoolButton = (Button)rootView.findViewById(R.id.theCoolButton);

           // We create a button event listener called "OnClickListener.

            //Make sure you had imported "OnClickListener" for your fragment, namely "import android.view.View.OnClickListener"

            theCoolButton.setOnClickListener(new OnClickListener()

            {

@Override

public void onClick(View v) {

theCoolString = theCoolEditText.getText().toString();

theCoolTextView.setText(theCoolString);

}

            });

            return rootView;

        }

    }

}
You can also find this project soon on GitHub.