1. The Tools Needed for Programming Android Apps
1.1. Downloading, Installing and Launching the Android SDK
First, as in the case of any operating system, it is inevitable to get familiar with the “tools” necessary to develop software for that particular OS. In case of Android, you have two options: the Android SDK or Android Studio. In this tutorial, you will learn how to use the Android SDK. This is because of the fact that Android Studio is still in development, and many functionalities are incomplete. Nonetheless, in future tutorials, we will take the time to scrutinize it in detail.
As a result, download the Android SDK from this website http://developer.android.com/sdk/index.html. As soon as you downloaded it, unzip the content onto your hard drive, resulting into having one folder that contains two other folders, “eclipse” and “sdk.” In order to launch the Android SDK, you need to go to the “eclipse” folder where you can find an “Eclipse.exe” (if you work on Windows) or “Eclipse.app” (if you work on Mac OS). Clicking on it launches the program.
The first thing you will see is a window that requires you to enter the place where you intend to store your android project. To be more specific, you first need to specify a “workspace.” A workspace is a folder where you can store various Android projects. Here, we will create a folder containing all Android workspaces called “androidProjects.” Also, in this folder, we will create a workspace for our very first Android project, “myFirstAndroidProject.”
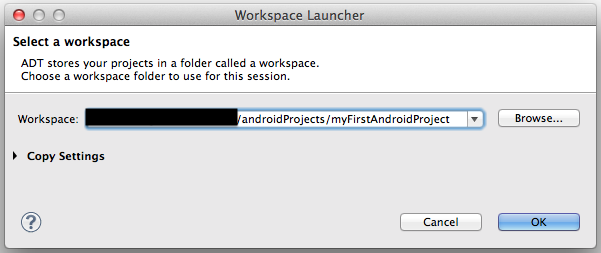
Image 1 displays the workspace launcher window.
Now, just click on “OK” and you create your workspace holding your Android project.
The next thing you see is another welcome window where you can read basic information about the Android SDK, how to build your first app, and so on. In order to skip this welcome tour, click on the “X” sign highlighted in red in the picture below.
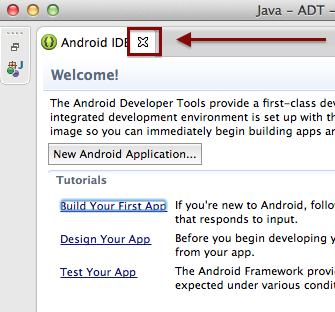
Image 2 displays the welcome view after having created an Android workspace.
After having done this, you see the different default sections of the Android SDK. Bear in mind that you can modify the display of the Android SDK sections according to your own preference. In this tutorial, we will not do this, because it is more helpful for beginners to learn how to deal with the default display of sections than starting right away with the customization settings. Nonetheless, we will talk about customization settings later.
In the picture below, you can see four main sections:
1) The package explorer
2) The open editors section
3) The outline section shows a content outline of a file you edit
4) Extra section for different views, such as “Problems,” “Javadoc,” “Declarations,” “Console,” and so on.
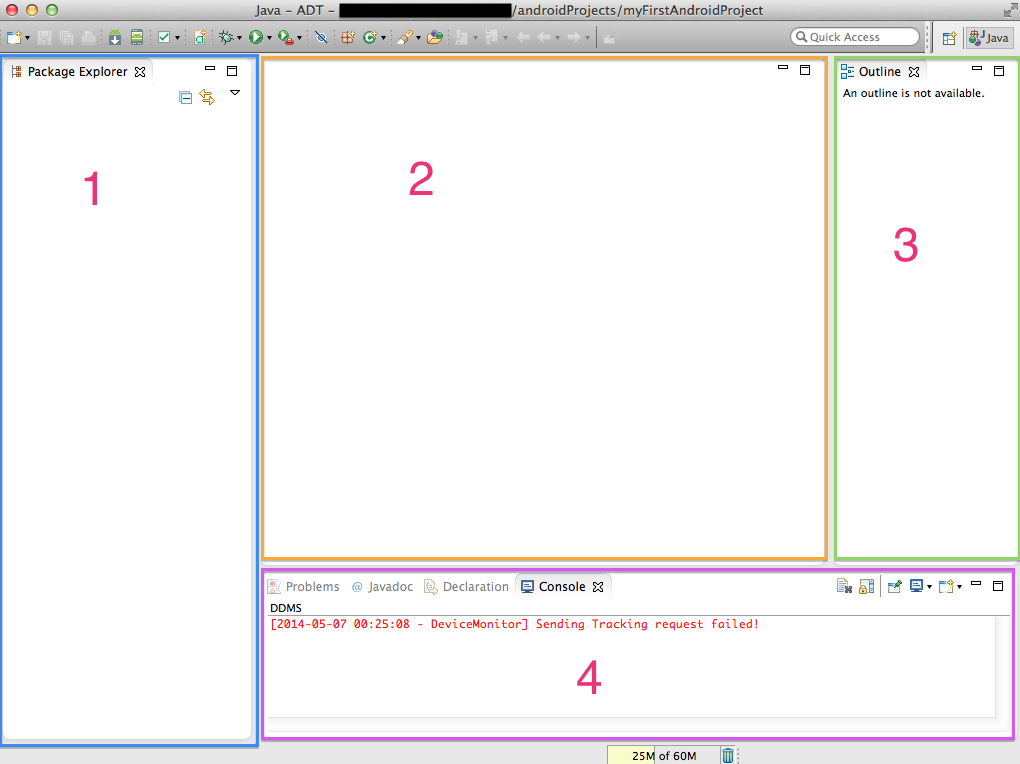
Image 3 displays the default structure of sections / views of the Android SDK.
1.2.The main sections / windows of the Android SDK
1.2.1. The Package Explorer
The package explorer is probably the most important section of the whole Android SDK. It functions as the place where you see, create, modify, delete the structure of your Android projects. In short, it is the section where you administer the whole class / file structure of your Android app.
1.2.2. The Open Editors Section
The open editors section is probably the second most important section of the Android SDK, as it is the place where you can see the content of different files located in your Android project. For example, usually in that section, an Android developer contemplates the Java code of the respective Java classes belonging to your Android project. This is also the location where you actually write your Java code.
1.2.3. The Outline Section
The outline section is the place where the content / structure of a particular file is displayed. For instance, if you intend to scrutinize the structure of a (complex) Java class, you go to this section and there, you will receive more information – among other things – on the methods / functions used in this class.
1.2.4. Extra Section
This area of the Android SDK is also a very useful place, because it helps the developer analyze his / her Android app in different ways. For example, in image 3 above, you see that the “Extra section” contains the following default tabs: problems, javadoc, declaration, and console. The “problems” tab is an essential view telling the developer what kind of problems are encountered while developing an Android app. This can be a missing a Java class that is referenced within another Java class or a compile error. The “Javadoc” tab is the place where a developer documents the source code of the respective Java class. There, he / she describes – among other things – and documents the functionalities and their purpose within the class and, if necessary, for the app as a whole. The “declaration” tab is a view where the developer can take a look at the declaration of types of data used in the respective Java class. The “console” tab is also a very helpful view where the developer receives more information on the inner processes of an Android device. For example, if an Android device is connected to the computer used for development, the developer can scrutinize the manifold processes going on while using an Android device. By this, he / she can analyze what an actual Android device does in the background or foreground while using his / her Android app.
Please bear in mind that this section can be extended by many other tabs with different functionalities. However, as this is an introductory tutorial for beginners, we will focus on the more detailed possibilities and functionalities of the Android SDK concerning the different sections, areas, and views in future tutorials.
1.3. The Toolbar and the Open Perspective Functionality
Apart from the previous sections and views, an Android developer also has to use
4) the toolbar and
5) the “switch functionality” open perspective.
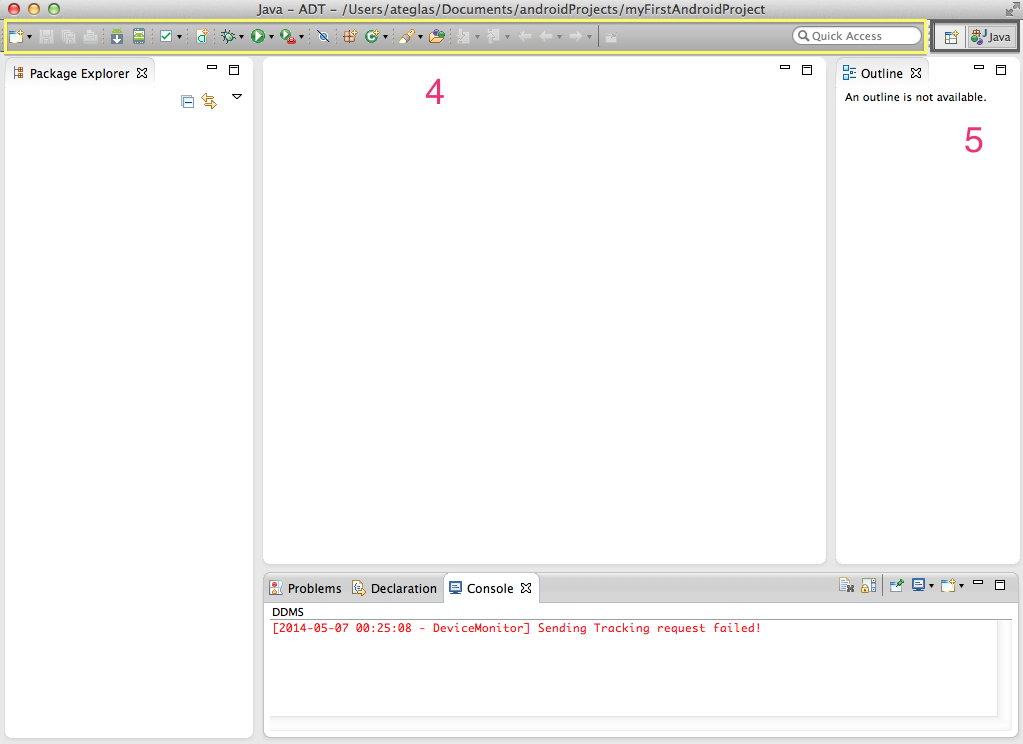
Image 4 displays the default structure of sections / views of the Android SDK with the toolbar and the open perspective functionality highlighted.
1.3.1. The Toolbar
Android SDK’s toolbar is a section where a developer has a toolset at his / her disposition. For example, the toolbar makes it possible to add new Android projects, files, classes, java packages, etc., run an Android app, go back or go forward to a Java classes, and so forth. In future tutorials, we will discuss the whole toolset in detail. For now, bear in mind that the toolbar is a one central point where you can administer your app and your workflow in a significant way.
1.3.2. Open Perspective
The open perspective functionality or “switch” is a mechanism to switch between different “perspectives.” By “perspective,” the Android SDK means to offer the possibility to make the Android SDK switch between various aspects of how to develop software. As this explanation may not be self-explanatory at first, it becomes clearer after having gone through the following steps.
First, click on the window icon that you find in the open perspective section as depicted in image 4:
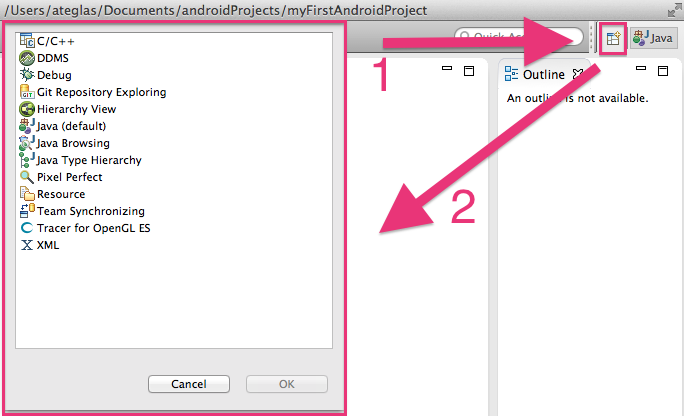
Image 5 displays the window that is opened up as soon as the user clicks on the window+ icon depicted in the upper right corner.
Step 1) means that you need to click on the window+ icon. If you do that, you see the new window that appears on the left hand.
Step 2) means that you can select one item displayed in this new window. At first, you have no clue whatsoever of what you actually have to choose. Do not worry, you do not need to know all of the items listed here now; during the course of your Android apprenticeship, you will come along them various times where you will need them. However, for the beginner’s phase, we will take a closer look at “DDMS.” Hence, if you select DDMS and click on “OK,” you will see the following:
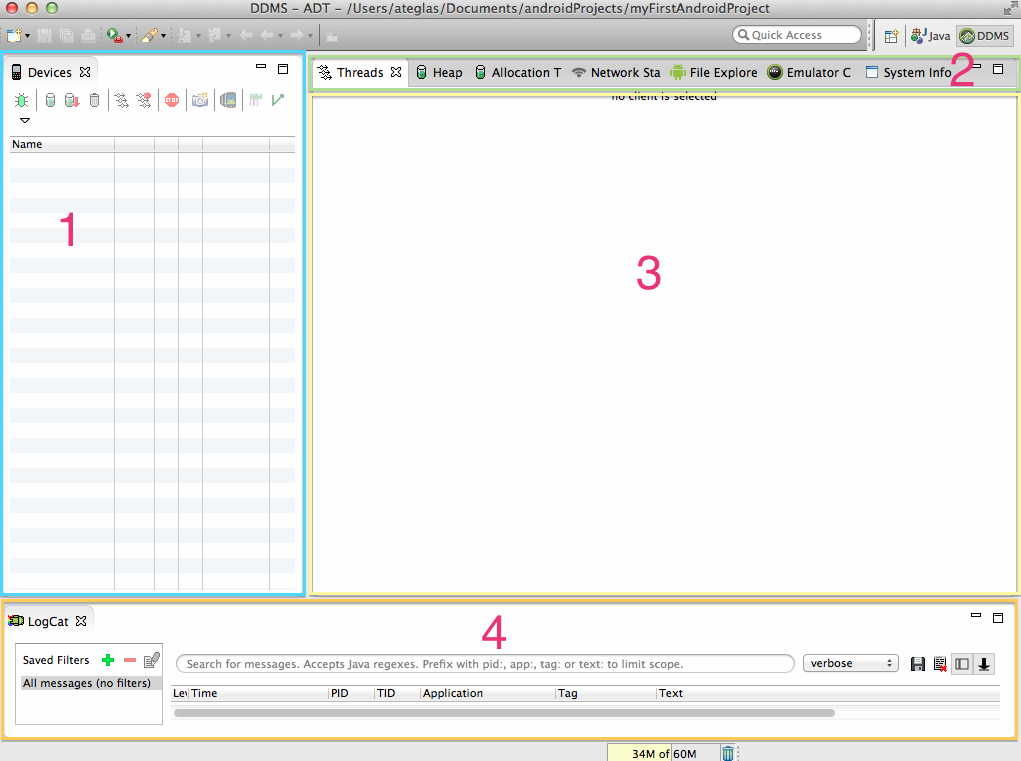
Image 6 displays the default structure of the DDMS perspective.
Now, it should be clearer what the Android SDK means by “perspective.” As you can see, you have switched the previous perspective to a completely different one, namely the DDMS perspective. DDMS stands for Dalvik Debug Monitor Server. We will talk about it in future tutorials more comprehensively. Only remember that it is basically a toolset for monitoring and analyzing the performance and processes of an Android app on an actual device. In short, the following sections of this DDMS perspective are as follows:
1) Devices means that here, you can see all the Android devices connected to your computer, whereby you can also see which apps are running on them. There, you have the possibility to see the heap and memory allocation, make a screenshot of what the user currently views in your app, stop an app, and so forth.
2) It is a practically a sort of a “ribbon” where you can receive more detailed information on different areas of the overall technical performance of your app. For instance, you can select tabs, such as threads, heap, network, etc.
3) This is the area where you actually see the information regarding the tab you selected from the ribbon mentioned in 2).
4) This is also an area where you can add more tabs. The default tab is LogCat. LogCat is a functionality for analyzing system logs displayed on the actual Android device. This tool is very useful to find out more specific and detailed information on what your device actually does in the background and what information your app displays there. Remember that leaving logs in your Android device may expose information about sensitive data, such as usernames, passwords, and so on. Also, too many logs displayed by your app may also reduce the battery life of your Android device if the app produces many logs.
For example, you can analyze what and how many threads are created. Furthermore, you can also scrutinize how the memory is handled, such as heap and allocation, the network processes, and so forth. As you can see, DDMS is a very useful perspective within the Android SDK, which you will use on a regular basis in your future Android apps in order to evaluate the overall performance of your Android app.
Now, you may also know how to get back to the previous perspective. You do this by simpley clicking on the “Java perspective.” See picture below:

Image 7 displays how to switch back to the original Android SDK perspective.
After having clicked on the Java icon, you can see the following:
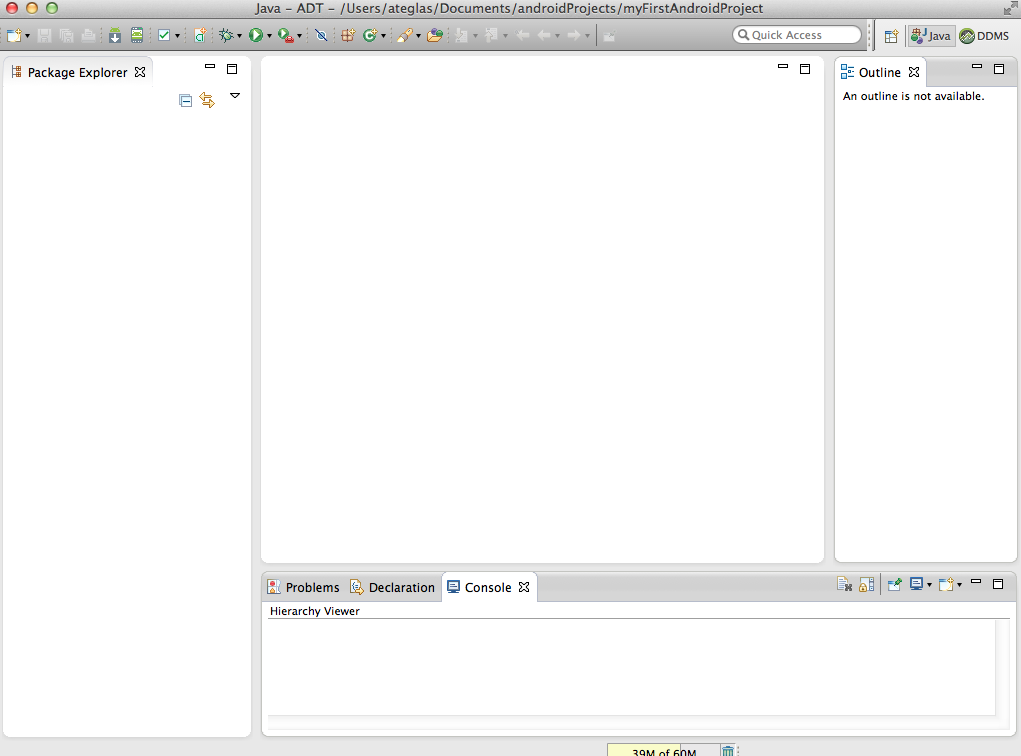
Image 8 displays the default Android SDK perspective.
Voilà, and you are back to the previous Android SDK that you know since the launching of it.
2. Creating your First Android App
2.1. Create an Android Project
2.1.1. The First Seven Settings
After having gotten to know the basic sections and functionalities of the Android SDK, we will learn how to create our first Android app. In order to do so, click File > New > Android Application Project.
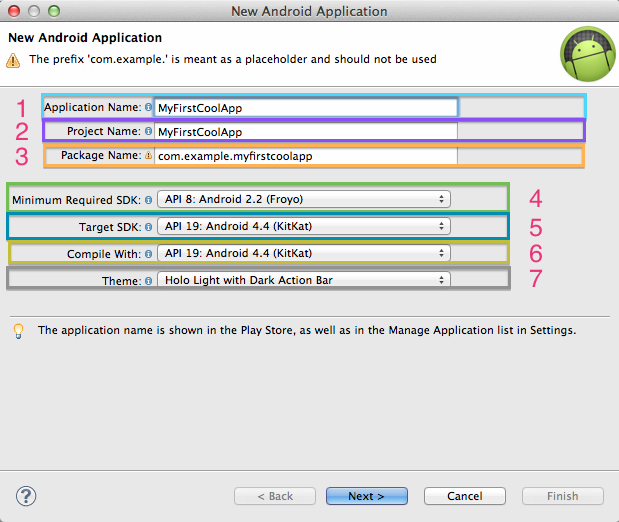
Image 9 displays the window for creating a new Android app.
In the picture above, you can see that you need to fill out three text fields and you need to select one option in four dropdown options. Let us go through one by one.
1) The application name is the name of your Android app. Also, as the Android SDK itself displays it, it is also the name that will be displayed in Google’s PlayStore, namely this is the name that users or potential customers can see, browse, and look for. Thus, please remember that the name of your app is a very important decision; however, you do not have to know this name now. You can just enter a dummy name that you will be able to change later within the Android SDK. In our case here, we will use the app name “MyFirstCoolApp.”
2) The project name is the reference the Android SDK will use in order to manage various Android projects within your Android workspace. Please remember that a workspace is the place where you store your distinct Android projects, and the workspace is not the actual Android project. Think of the workspace as a container holding different Android projects. In addition, you can only use the same name once in the same workspace. Hence, the project name has to be “unique” within the workspace.
3) The package name is a unique identifier for your Android application. Furthermore, it is one of the most important settings you need to be careful with. The reason why it is so important is the fact that Google’s PlayStore and the Android operating system use the package name as the unique identifier in order to identity your app as a unique entity. Think of it as your personal ID card which is unique to you and it only exists once in the world. Moreover, the Android operating system uses the package name to make sure that updates of the same app are possible. This may sound weird why you should not be able to update your app if your app has a specific application name. The reason why the package name is used as the unique identifier is that there may be two different apps coming from two different developers, but each app as the same application name. There might be John Doe’s Doughnut app and Mike Jones’ Doughnut app, and both apps are called “Doughnut app.” And, both apps may be called that way in Google’s PlayStore, but they still have to be different in one characteristic in order to make it possible to the Android operating system and Google’s PlayStore not to confuse Mike Jone’s Doughnut app for John Doe’s and vice versa. Thus, here comes the package name in; the package name creates this unique distinction and unique identifier to differentiate unequivocally to whom each app belongs. To sum it up, before you upload your app to Google’s PlayStore, evaluate your package name again so that it is not your dummy package name and that it suits you best. Also, do not use “com.example” as prefix for your Android package name, because of two reasons: a) it appears unprofessional, because practically every experienced developer recognizes the “com.example.” prefix as the default package name prefix generated by the Android SDK, and b) each app should have its own distinguishable prefix in order to make differentiation between the Android apps more easily.
In this case, we use com.example.myfirstcoolapp as the package name, because we will not upload this app to the PlayStore and we only use an sample app, not a final one.
4) Minimum Required SDK is the SDK API version you want your Android app to support as the lowest possible Android version a potential Android devices is running on. In other words, you need to decide if you want to support older Android devices or not. Please bear in mind that “older devices” always depends on when an Android version was considered “old.” As the development of the Android operating system constantly continues, an Android version that was considered “old” today may not even be supported at all in the future. Thus, you will have to keep yourself constantly updated on what is considered an “old” Android version. In addition, also remember that the Minimum Required SDK is used to indicate to the operating system what is the Android version to compile against. For example, if you do not introduce any Target SDK, the Android operating system will simply take the selected Minimum Required SDK as its version to compile the app against.
5) Target SDK is the highest Android version you select that the Android operating knows that you worked with. Furthermore, by choosing a particular Android version, you also make sure that your app is tested against that particular Target SDK. It is best practice to choose the latest one. In this tutorial, we use the latest Android API 19.
6) Compile with means that you select the Android version your app should be compiled with. Usually, you select the one that is the same as in the case of the Target SDK and it is also highly recommended to do so. In this tutorial, we use the latest Android API 19.
7) Theme means that you basically select a template. Currently with the latest Android API 19 (as of May, 2014), you can select four: None, Holo Light, Holo Dark, or Holo Light with Dark Action Bar. In this case, we will select “None,” as you will learn how to develop an Android app from scratch.
If you are done selecting and filling out the textfields, click on “Next.”
2.1.2. Configuring the Project
In the next window, you see the following:
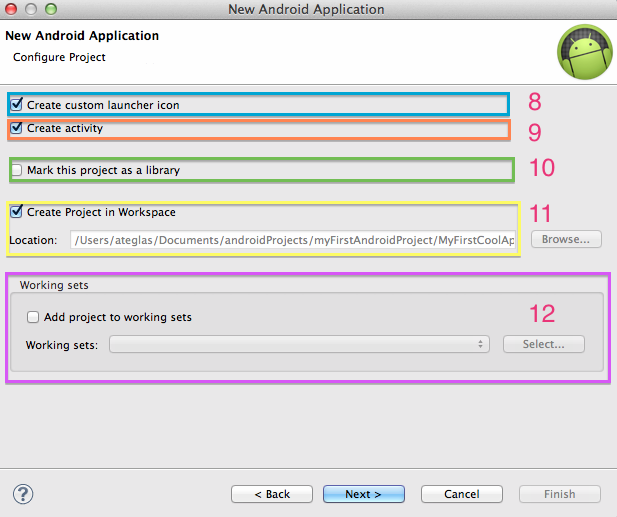
Image 10 displays the window where you configure your new project.
8) Create custom launcher icon is the icon the Android operating system displays on the device. In other words, each Android app uses a specific icon to show to the user that your app has an iconic representation on your device. Hence, by clicking on that launcher icon, the user will launch your app. As a result, if you leave this box checked, you will have to create your own custom one and implement. As a beginner, it is not necessary to leave this box checked, as you do not need to face with the specifics of the launcher icon; thus, uncheck this box. However, if you feel confident in doing custom launcher icons, then leave this box checked. Yet, do not forget that in the next window, you would have to select your launcher icon.
9) Create activity means that you create your first Android app with an activity already generated. What an “activity” actually is will be illustrated in another tutorial. Leave this box checked, as an activity is a core functionality of any Android app and you should start off programming with one already placed in your first Android app.
10) Mark this project as library should be left unchecked, because we will not deal with libraries now. Only memorize that an Android project can be transferred into an Android library.
11) Create Project in Workspace should be left checked, as we will create our project in the current workspace selected.
12) Working sets should be left unchecked, as we will not use them now; in future tutorials, you will learn more about them.
2.1.3. Create Activity
You have come very close to actually start off developing, but you still need to decide the following:
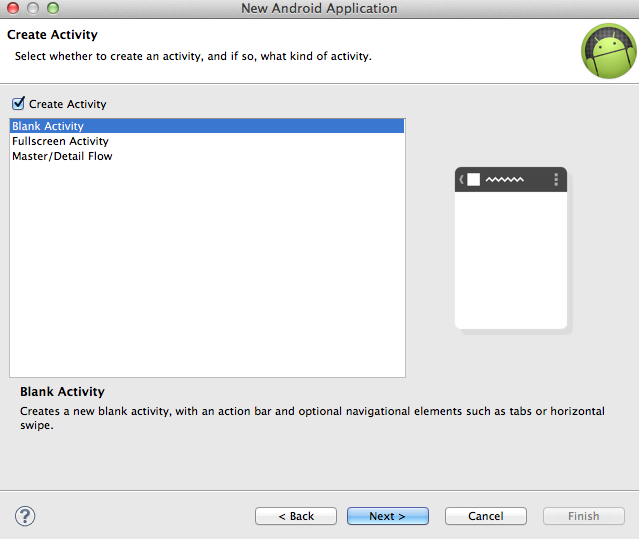
Image 11 displays the list of activities available during the process of creating a new project.
In the image above, you see that you have to select one of the three options displayed: Blank Activity, Fullscreen Activity, Master/Detail flow.
Blank Activity: You create a new blank activity + action bar + optional navigational elements.
Fullscreen Activity: Creates a new activity toggling the visibility of the system UI (status and navigation bars) + action bar upon user interaction.
Master/Detail Flow: This activity creates an app having two sections: on the left hand, you have a master fragment and on the right hand, a detail fragment. Usually, you choose this activity if you have a larger screen at your disposal, such as tablet.
In this tutorial, we will choose a blank activity, as it is the default form of an activity and as the other forms of activity are rather for specific use cases that we will not touch upon in this tutorial.
Thus, choose “Blank Activity” and click on “Next.”
2.1.4. Blank Activity
You have come very close to actually start off developing, but you still need to decide the following:
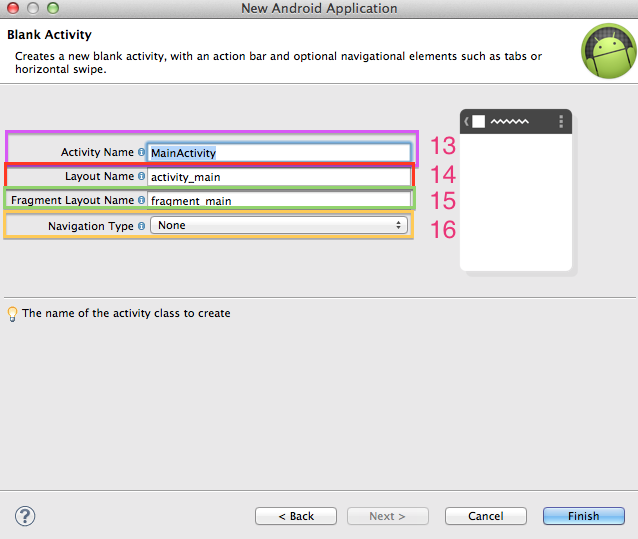
Image 12 displays the window where you to set important activity and navigation settings.
13) MainActivity means that you can choose (by writing) a name for your blank activity. Bear in mind that this name will be used as a reference from all other Java classes that need to refer to this particular activity. In this tutorial, we leave the default name.
14) Layout name is the name you choose for the layout of your activity. A layout the visual appearance of your activity, meaning it is the area where the GUI of the activity is handled. In this tutorial, we leave the default name.
15) Fragment layout name is the name you select for the layout of the fragment your activity will choose. We will discuss fragments and their layout in another, specific tutorial. In this tutorial, we leave the default name.
16) Navigation type is the type of navigation you choose for this particular activity and, to a great extent, how the user will actually navigate your app. This option is quite important, as it determines how your user interacts with your app and, more importantly, it determines the “look and feel” of your app. In this tutorial, we do not select any specific navigation type, namely we choose “None.”
After that, click on “Finish.” Now, the Android SDK is generating the files your first cool Android app requires, which may approximately 30 seconds.
Finally, your first cool Android up looks like this in the Android SDK:
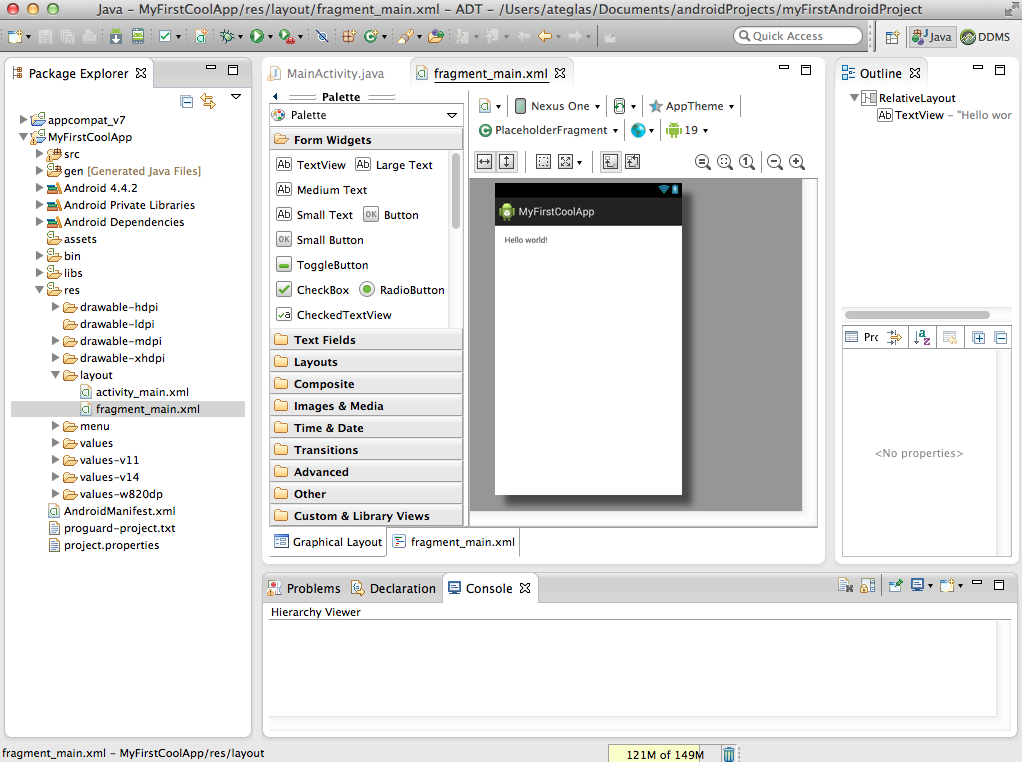
Image 13 displays Eclipse with the project structure you have just created.